Pie Making 101: Mixing Pie Dough
Practice makes perfect, but this primer will have you turning out flaky crusts in no time.
In college, I had a really hard time suppressing my experimental streak. Perversely, lacking access to a kitchen made me crave more ambitious cooking projects, the most ill-conceived of which involved fermenting five gallons of kimchi in my dorm room (do not advise).
So when I moved into a single-wide mobile home for the summer to work my goat dairy job, I took full advantage of the (somewhat) functional kitchen within. The stove was ancient and two of the burners didn’t work, a reclusive if unsettling black snake sometimes inhabited the cabinets (my glass-half-full view of my legless friend was that it ate the mice that also frequented the cabinets), and I had the most motley assortment of cooking tools known to man.
None of that stopped me from roasting my first chicken, making dinner regularly for my farm-intern friends, experimenting with fermentation projects, or teaching myself how to can. My most memorable canning project came about after I found a tree on campus absolutely loaded with crabapples. I tasted one and decided that they needed to be turned into apple butter.
What ensued probably looked like chaos. I didn’t have a canning funnel, jar lifter, or food mill. I found some unused window screen in the dark corner of a closet, washed it as best I could, and used that to strain out the seeds and peels. It was horribly messy and inefficient, but at the end of that project I had about 20 jars of the most beautiful and delicious pink apple butter. I was so proud that I gave away jars to everyone I knew.
While I feel a certain wistfulness about that time of my life (and certainly for that outstanding apple butter—probably the best I’ve ever made), I’ve learned that having the right equipment for canning is well worth the money. But even more than the right equipment, setting up your workspace is the real key to success.
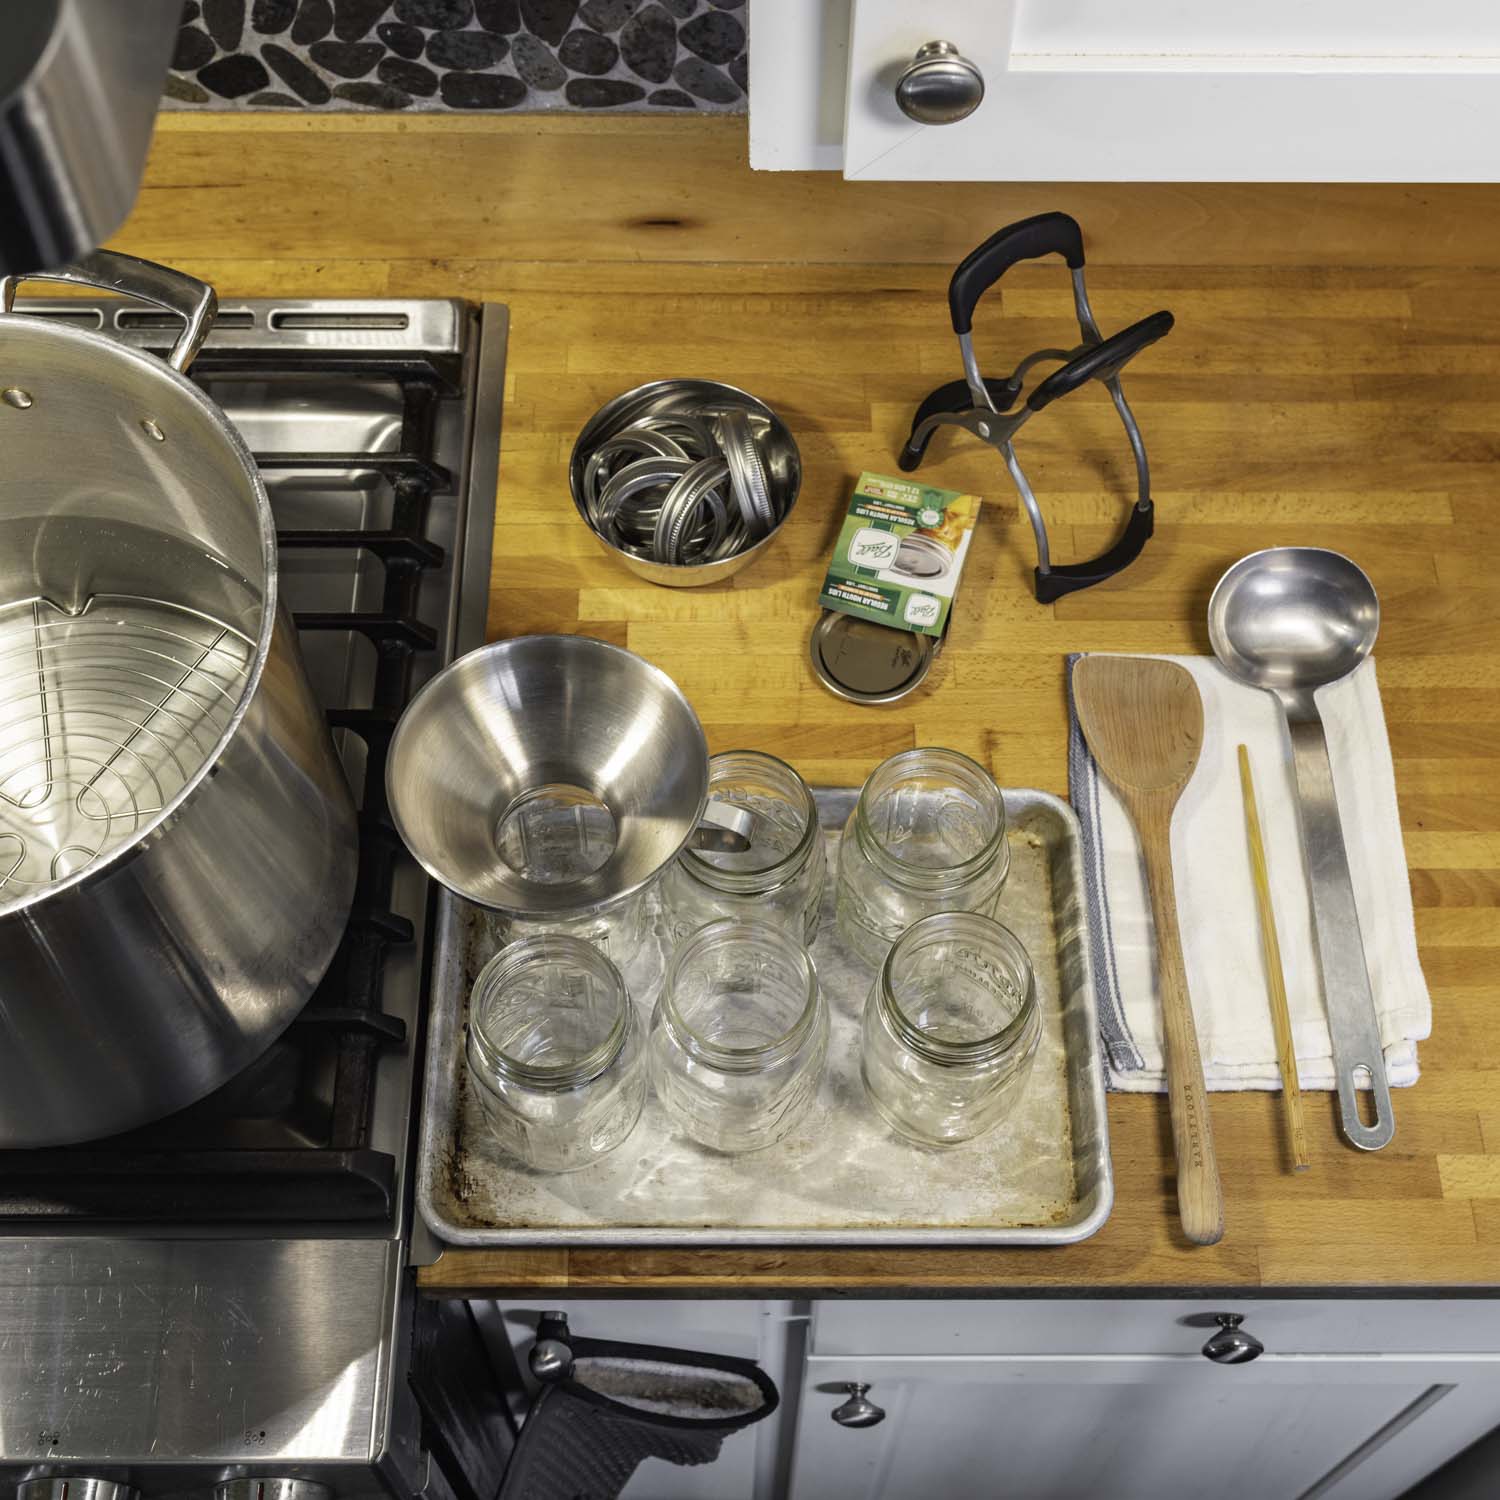
I’ve honed my canning workstation over the years, and now I set everything up before I even combine fruit in the pan with sugar. I have everything I need within easy grabbing distance, which makes the process feel so much more controlled and less stressful. It allows me to focus on the fruit (or vegetables, if I’m pickling), which is the entire point!
Here’s what you’ll need to set up your canning station:
Your stock pot should be on a back burner where the water within is being kept around a simmer. You want the water to be near a boil when you’re ready to drop your filled jars in. I keep a lid on my pot so the water isn’t evaporating a ton.
I sterilize my canning jars and rings in the dishwasher, but a good handwashing with soap and hot water works fine. You’re supposed to keep your jars hot until they’re ready to fill—you can do that by stashing them in the stock pot with the hot water or preheat your oven to 250°F, set the jars on a sheet pan, and put them inside.
Use new canning lids every time. You’ll want to wash them, but unlike the old days you no longer need to warm them up in hot water before using them to top your jars.
A canning funnel and jar lifter both seem like single-use items that aren’t worth the money. That’s what I thought when I first started canning. I was wrong. Both items can be had very affordably and they make a couple of tricky tasks extremely easy, so they’re well worth the price of admission.
I’ve tried using just a ladle and no funnel to transfer molten jams and boiling brine from pot to jars. It is possible but very messy, and you’ll spend a lot more time wiping off jar rims. The jars will be very hot when you’re trying to do this, making the whole process ever so much more fun. Do yourself a solid and spend $5 (heck, $7 to $10 gets you a metal one) for a canning funnel. (The funnel will come in handy for plenty of other mundane jar-filling tasks.)
I’ve also tried to kludge together a canning setup by using tongs instead of a jar lifter to transfer jars in and out of the canning pot. Again, this is ill-advised. You are dealing with fragile, piping-hot glass jars and large vats of boiling water—it’s really easy to get burned. You want the specialized tool, trust me. And again, it will set you back $5.
The wooden spoon and ladle are for stirring and scooping. I recommend wooden spoons not for romantic reasons but because they are guaranteed to be non-reactive (some metals react with acidic ingredients and can lead to metallic flavors in your finished product) and I really dislike the sound of metal on metal. A silicone spatula would serve you just as well.
A ladle is nice to have around for cooking generally, but if you don’t have one you can use a large serving spoon or a sturdy liquid measuring cup.
If I’m canning any kind of sweet preserve, I keep a chopstick or a butter knife handy to help remove air bubbles once the preserves are in the jars.
I lay a dry kitchen towel down on my workspace and set the jars on top of it for filling. It helps stabilize the jars, absorbs any water from the jars after they come out of the hot water bath, and catches any spills so I don’t have to clean my countertop later. The damp kitchen towel is for wiping off jar rims or anything else that gets sticky.
There are other tools you can have around—a thermometer, a magnetic lid lifter—but these are the essentials. They make preserving so much easier and if you can make something like that easier, you’re more likely to do it. I’d argue that even if you only can twice a year these tools are worth the investment, as most of them have multiple uses.
Megan Scott is a food editor, writer, and recipe developer with over 15 years of wide-ranging experience in the culinary industry. She has been a cheesemaker’s apprentice, a bakery owner, a pastry chef at a fine dining restaurant, and a culinary director at a creative agency where she developed thousands of recipes for food brands. In 2019 she co-authored the ninth edition of Joy of Cooking, and she is the cohost of the Joy of Cooking Podcast. She lives in Portland, Oregon, with her husband and collaborator, John Becker, and their two cats, Loki and Lola.


Practice makes perfect, but this primer will have you turning out flaky crusts in no time.

Several strategies for getting around the laborious task of peeling lots of tomatoes.