On (Not) Peeling Tomatoes
Several strategies for getting around the laborious task of peeling lots of tomatoes.
Making a proper pie crust is among my proudest moments in the kitchen. I did my reading. I practiced. I was persistent in the face of greasy, shrunken crusts, and my patience and practice finally paid off. My learning curve brings us to the first rule of pie-making: don’t beat yourself up if your crust doesn’t turn out perfectly. I wish there was a silver bullet for pie dough, but really, it’s all about practice. The good news is that no one will mind eating your practice pies as you *ahem* strive for excellence.
While pie can be made under humble circumstances (we have substituted a wine bottle for a rolling pin more than once), having proper equipment will go far in creating praiseworthy pastries.
There are two styles of rolling pin used in pie-making—the standard pin with handles, and the pastry pin, or French pin, which has a tapered or uniformly cylindrical shape and no handles. Choose a pin of a size and weight you find comfortable.
We prefer French pins for their maneuverability and because they are generally lighter in weight than handled pins. Wood is the perfect material for all rolling pins. Hollow metal pins filled with ice water sweat, and glass pins are beautiful but fragile. Marble pins are heavy, but some bakers prefer them because they help to keep the dough cool and are easy to clean.
Mixing the dough can be accomplished by hand or machine. A pastry blender, with 5 or 6 bowed metal blades for cutting butter into flour, is the best tool for the hand method, but a food processor also makes good and speedy dough. If you lack both of those, your hands make an admirable substitute as long as you work quickly so the dough does not become too warm.
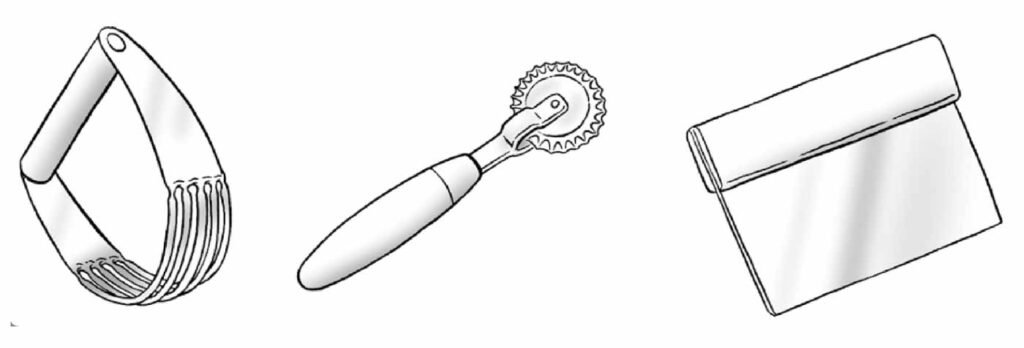
Other useful tools include a ruler, to measure the thickness and diameter of dough; a fluted pastry wheel (a pizza cutter works as well), for cutting lattices; and a metal dough scraper (also called a bench scraper). If you want to par-bake or blind-bake crusts, you’ll need pie weights or uncooked dried beans, rice, or granulated sugar. Some bakers cover the edge of their pie crusts with a metal shield to prevent overbrowning, but you can do the same thing with strips of foil shaped into a ring.
Pie pans come in two standard diameters, 9 and 10 inches; the former has a capacity of around 4 1/2 cups, the latter 6 cups. Standard pie pans are around 11/4 inches deep; deep-dish pie pans are 1 1/2 inches deep.
Glass pie pans produce wonderfully brown, crisp crusts, but you may need to reduce the baking time by 20 to 25 percent. Heavy metal pans, whether matte, shiny, or black finish, make for well-browned crusts. Ceramic pans are beautiful, but they insulate the crust, resulting in slower baking and a tendency toward a soggy bottom crust.
No matter the material of your preferred pie pan, it is more than possible to bake perfect pies in it with a little practice. The only material we do not recommend for pies with a pastry crust is disposable aluminum, as it causes crusts to bake unevenly.
You can bake most pies either in one large pan or divide the dough and filling among several small pie or tart pans. However, it is best to bake fruit pies, like apple or cherry, in a large format, as the longer baking time allows the fruit to cook and thicken properly.
There are two important things to bear in mind when making pie dough: keep the dough and the ingredients used to make it well chilled, and handle the dough lightly but confidently to prevent excessive gluten development.
Butter melts at 95˚F, a few degrees below body temperature, so for a buttery, flaky crust, pre-chill the butter before mixing and keep butter-based doughs cold. Doughs that use shortening or leaf lard are more forgiving, as the melting point of these fats is above body temperature, (100˚ to 115˚F).
Minimal handling of the dough is also essential: in addition to the danger of melting the butter with warm hands, excessive mixing overdevelops the gluten, leading to a tough crust. Though some gluten development is necessary, taking care with this step ensures a tender crust. Our best advice to would-be pie makers is to practice making pie dough regularly to get a feel for the process. Perfect pie crust is well within reach with practice and proper technique.
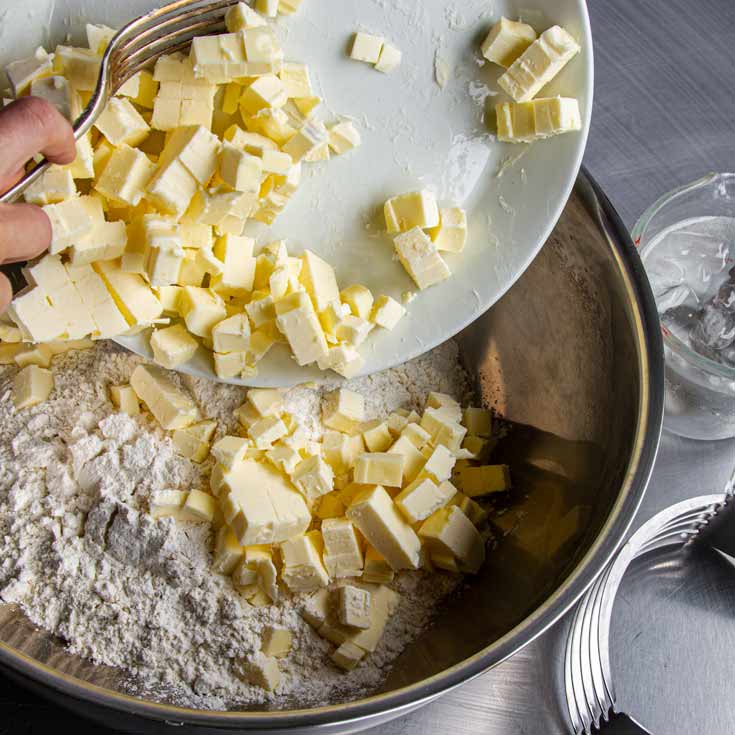
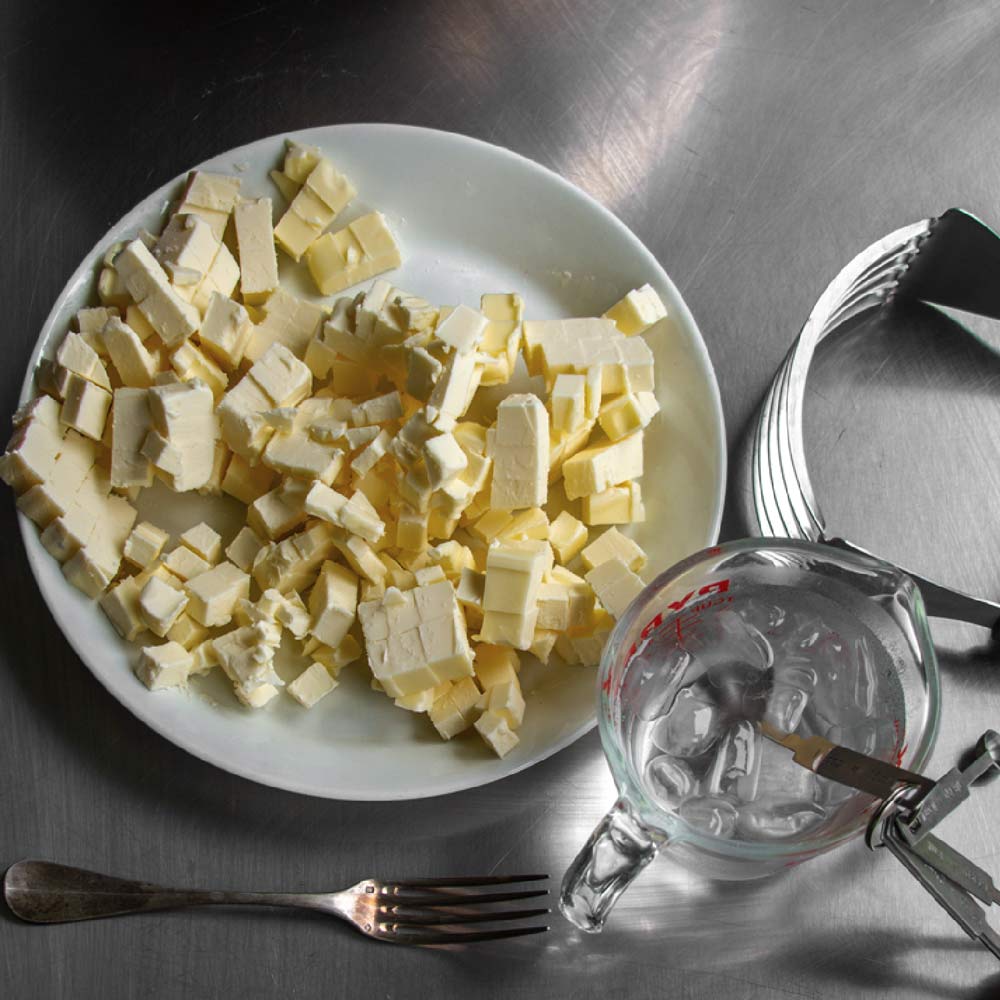
Begin by cutting the cold fat into roughly 1/2-inch chunks. If your kitchen is very warm, you may want to refrigerate butter chunks for an additional 15 minutes after cutting them. You can also freeze your butter and use a box grater to grate it directly into your flour.
Use a pastry blender or your fingers to work the fat into the flour.

If using your fingers, rub the fat into the flour, flattening the pieces between your fingers. As you do this, it can help to think about the role butter plays in pie crusts. The ideal pie crust is tender and flaky, not dense, greasy, or crumbly. To achieve a flaky texture, you want the butter to be in flat sheets coated in flour.
Working the butter into the flour until it is in tiny, crumb-like pieces is not necessarily a bad thing, but your crust will be less flaky and more crumbly—closer to shortbread than pastry. (Some pie crusts combine these two strategies to achieve a balance of flakiness and tenderness.)
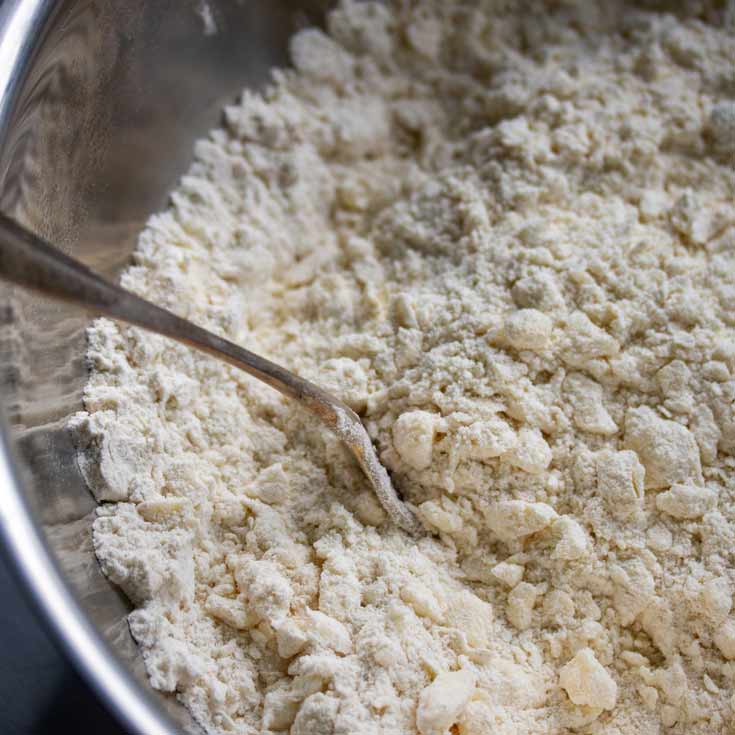
Continue to work until all the pieces of fat are flattened and well incorporated into the flour. Getting all the pieces of fat to the same size is unnecessary—in fact, if you do, you will likely overwork the mixture and heat up the fat too much. The fat should be in firm, separate pieces, some fine and crumb-like, some the size of peas or a little larger, and some larger, flattened pieces.
If you are using the frozen butter method, you don’t need to work the butter into the flour at all: just mix it in gently so the pieces are separate and coated in flour.
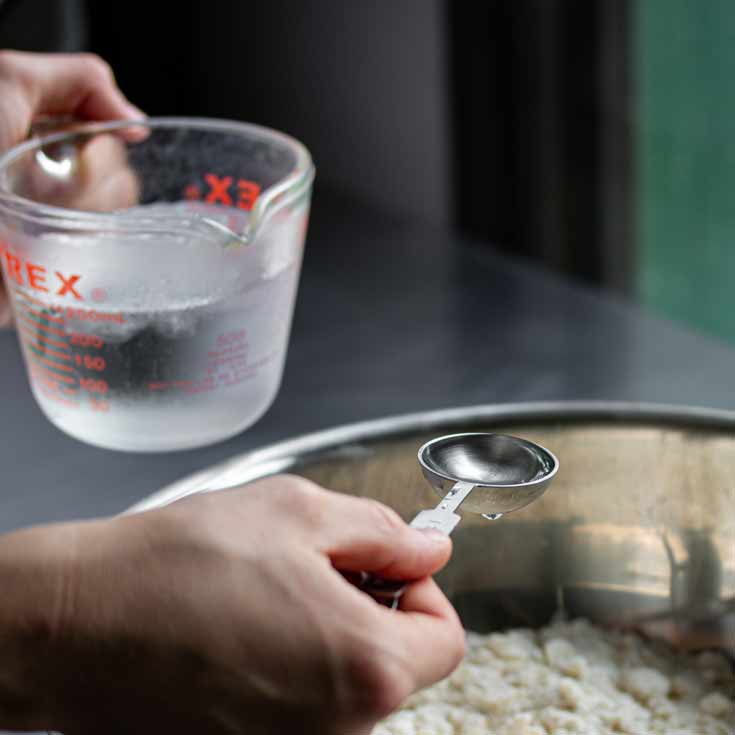
Next, bring the dough together with ice water. You want to add enough water to make the dough hold together but not so much it becomes sticky. The flour and fat mixture should be moistened only to the point where it appears “shaggy” but holds together when squeezed and is not powdery or crumbly. Remember that as the dough chills and rests in the next step, it will hydrate evenly, so it should look just a touch on the dry side at this point.

The amount of water you’ll need to add varies and depends on the protein content of the flour, the type of fat used, the degree of blending of fat and flour, the temperature of the fat and water, and the ambient humidity. In other words, you have to go by feel rather than exact measurements.
If the mixture gathers into a mass on its own, without pressure, it is too wet. However, beginners should probably err on the side of over moistening, as a very dry dough tends to split or crumble when rolled. When making pies at high altitudes, where evaporation is greater, you may achieve better results with pastry if you add a bit more liquid.
-
You can make pie dough in less than a minute with this appliance. Combine the dry ingredients in the food processor and process for 5 seconds. Cut the cold fat into cubes and scatter over the dry ingredients. Pulse in 1- to 2-second bursts until most of the fat is the size of peas. With the machine turned off, drizzle some ice water evenly over the top. Pulse until no dry patches remain.
Continue adding water in small amounts and pulsing until the dough holds together when squeezed and is neither crumbly nor wet. Do not allow the dough to gather into a single mass around the blade during processing. Transfer the dough onto a work surface (mind the blade!), press and gather it into a ball, then flatten it into a disk.
Mixing Pie Dough Using a Stand Mixer
Combine the dry ingredients in the bowl of a mixer fitted with the paddle attachment and mix at low speed for a few seconds, then add the cold fat. Mix on medium-low speed until the mixture is the consistency of coarse crumbs.
Add the ice water and mix until the dough begins to cling to the paddle. If the dough is still too crumbly, incorporate 1 to 3 teaspoons water with your hands so that the dough comes together when pressed. It’s best to finish stand mixer dough by hand because it is so easy to overmix.
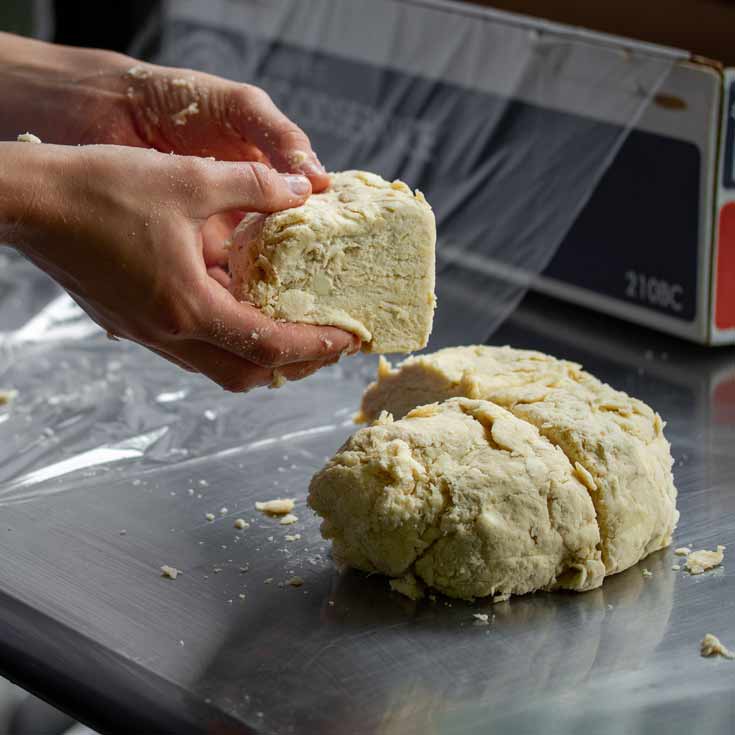
If you’ve made enough dough for a double-crust pie, divide the dough into 2 equal parts, or as directed in the recipe. At this point you may go in one of two directions, each of which has advantages and disadvantages.
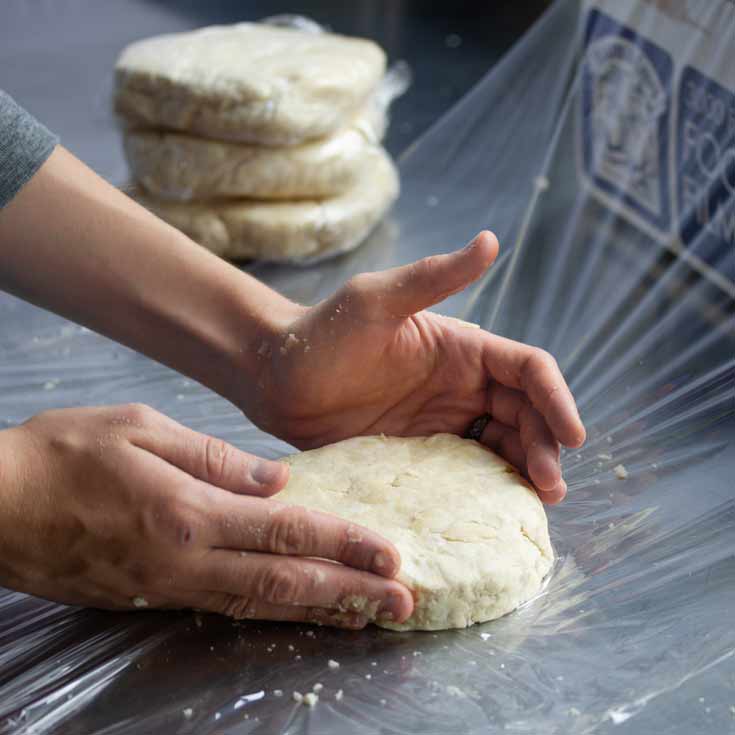
One option is to wrap the dough in plastic and refrigerate for at least 30 minutes before rolling it out. Letting the dough rest can make it easier to work with, as it allows the gluten to relax and gives the flour time to absorb the water evenly. If needed, you can keep the dough, well wrapped, in the refrigerator for several days. If the dough has been chilled for longer than 30 minutes, it may need to sit at room temperature until it feels firm yet pliable, like modeling clay, when pressed. If it is too cold, the dough will crack around the edges when rolled.
Another option is to roll out the dough immediately after mixing, fit it into the pie pan, and then chill it. The main advantage to this method is that the dough is supple right after being made. If your kitchen is very warm, however, you are better off refrigerating the dough before rolling and then again after it is in the pie pan.
Tightly wrap single-crust portions of dough in plastic wrap and refrigerate for up to 3 days. To freeze dough, either shape it into a disk and double-wrap it or roll out and shape the dough in the pie pan, then wrap tightly and freeze for up to 3 months.
Refrigerated dough may need to sit at room temperature for a few minutes to become pliable. Frozen dough should be allowed to thaw completely in the refrigerator before rolling and shaping. Dough frozen in a pie pan can be baked from frozen. You may need to add a few extra minutes of baking time.
Vary a basic dough for a double crust by adding one of the following to the dry ingredients:
Megan Scott is a food editor, writer, and recipe developer with over 15 years of wide-ranging experience in the culinary industry. She has been a cheesemaker’s apprentice, a bakery owner, a pastry chef at a fine dining restaurant, and a culinary director at a creative agency where she developed thousands of recipes for food brands. In 2019 she co-authored the ninth edition of Joy of Cooking, and she is the cohost of the Joy of Cooking Podcast. She lives in Portland, Oregon, with her husband and collaborator, John Becker, and their two cats, Loki and Lola.


Several strategies for getting around the laborious task of peeling lots of tomatoes.
The right tools in the right place = easier preserving.